Guide reflects the latest browser-based audio processing capabilities. All techniques tested on Chrome, Firefox, Safari, and Edge.
MP3 Cutter vs MP3 Trimmer — Is There Actually a Difference?
If you've ever searched for a way to edit an audio file online, you've almost certainly run into both terms stacked next to each other: MP3 cutter, MP3 trimmer, audio splitter, audio clipper. They're used interchangeably across dozens of tools and tutorials, and the inconsistency is genuinely confusing — especially when you're trying to figure out which type of tool you actually need for the job you're trying to do.
Here's the short answer: in casual usage, MP3 cutter and MP3 trimmer refer to the same category of tool. Both let you select a portion of an audio file and export it. But in practice, the two terms hint at slightly different intentions — and understanding that difference will help you make better creative decisions when you edit audio, regardless of which label the tool wears.
This guide covers everything you need to know:
- The functional difference between cutting and trimming — and when each approach makes sense
- Which tasks each approach is best suited for
- A complete walkthrough of how to cut and trim MP3 files for free, directly in your browser — no download, no account, no upload to a server
- The features that separate a basic audio cutter from a professional-grade one
- Step-by-step guides for the most common audio editing tasks beginners face
- Common mistakes and how to avoid them
- Answers to the most frequently asked questions about MP3 cutting and trimming
By the time you've finished reading, you'll have a clear understanding of which approach fits your specific situation — and a free tool you can use right now to get the result you're after.
Cutting vs. Trimming: The Functional Difference That Actually Matters
Let's define terms properly, because the distinction is subtle but useful once you understand it.
What "Trimming" Means in Audio Editing
Trimming is the act of removing unwanted audio from the beginning or end of a file — or both. It's a cleanup operation. You have a recording that's 4 minutes long, but the first 12 seconds are silence and shuffling sounds before the speaker starts, and the last 8 seconds are noise after the content ends. Trimming removes those dead zones from the edges. The core content stays intact — you're just cutting away the fat around it.
Trimming is what an editor does to a podcast recording before publishing. It's what a musician does to a vocal take to remove the breath before the first word and the room noise after the last note. It's a finishing operation — you're refining something that's already mostly what you want.
What "Cutting" Means in Audio Editing
Cutting is a more active, surgical operation. You're extracting a specific segment from the middle of a file — pulling out a section that is surrounded by other content you're not keeping. A DJ cutting a 16-bar sample from the middle of a 5-minute track. A video editor pulling a 30-second quote from a 45-minute interview. A producer isolating a drum break from the fourth minute of a soul record.
Cutting is about selection and extraction. You define a precise start point and end point, and you export exactly that segment — regardless of what comes before or after it in the original file.
Why Most Tools Do Both — and Why the Label Still Matters
In technical terms, both operations work the same way: you set a start time and an end time, and you export the audio between those two points. A tool that lets you do this can perform both trimming and cutting — the operation is identical. The difference is purely in your intention.
The label on the tool hints at what workflow it's optimized for. An "MP3 trimmer" typically features a clean interface built around scrubbing the edges — drag handles at the beginning and end of the waveform that make it easy to nudge the start and end points. An "MP3 cutter" often gives you more precise time-code input and may show a more detailed waveform for selecting a specific internal segment.
Our free audio cutter at Toolscrow is designed to handle both tasks in the same interface — a visual waveform you can drag for quick editing, combined with precise time-code input boxes for when you need millisecond accuracy. You'll use the same tool whether you're trimming silence from a podcast recording or extracting a 22-second sample from the middle of a song.
Quick Decision Guide
Removing silence from the beginning/end of a recording → Trimming.
Pulling a specific segment from the middle of an audio file → Cutting.
Both use the same tool — only your intention and workflow differ.
When Should You Cut — and When Should You Trim?
Understanding the distinction in the abstract is one thing. Knowing which approach to take for your specific task is more useful. Here's a breakdown of common audio editing scenarios and which operation fits each one.
Situations Where Trimming Is the Right Approach
| Situation | What You're Removing | Result |
|---|---|---|
| Podcast episode cleanup | Silence, room noise, and off-topic chat at start/end | Clean, broadcast-ready episode |
| Voice memo finishing | Button clicks, breath, silence before/after speech | Clean voice note ready to share |
| Recorded interview preparation | Pre-interview small talk, post-interview noise | Shareable interview segment |
| Audiobook chapter editing | Recording artifacts at beginning and end of takes | Clean chapter file ready for production |
| Music track finishing | Counting in at the start, silence decay at the end | Radio-ready track with clean start and tail |
| Voiceover cleanup | Breaths, background noise from beginning/end | Professional voiceover segment |
Situations Where Cutting Is the Right Approach
| Situation | What You're Extracting | Result |
|---|---|---|
| Creating a ringtone | The perfect 20–30 second chorus or hook from a song | Custom ringtone file |
| Music sampling | A drum break, bass line, or melody loop from a full track | Sample ready for production |
| Social media audio clip | A key 60-second segment from a podcast or interview | Shareable audio clip |
| Sound effect isolation | A specific sound from a longer ambient recording | Usable sound effect file |
| Quote extraction | A specific quote or statement from a longer speech | Clip for presentation or media use |
| Preview clip creation | The most representative 30 seconds of a longer piece | Preview/teaser audio file |
| Playlist segment isolation | One track from a DJ mix or continuous album recording | Individual track file |
In both cases, the process in the tool is identical: you'll set a start time and an end time, then export. The difference is in how you find those times and what you're preserving or discarding around the selection.
What Separates a Good MP3 Cutter From a Bad One
Not all online audio cutters are equal. The difference between a frustrating experience and an efficient one often comes down to five or six specific features. Here's what to look for — and how our tool addresses each one.
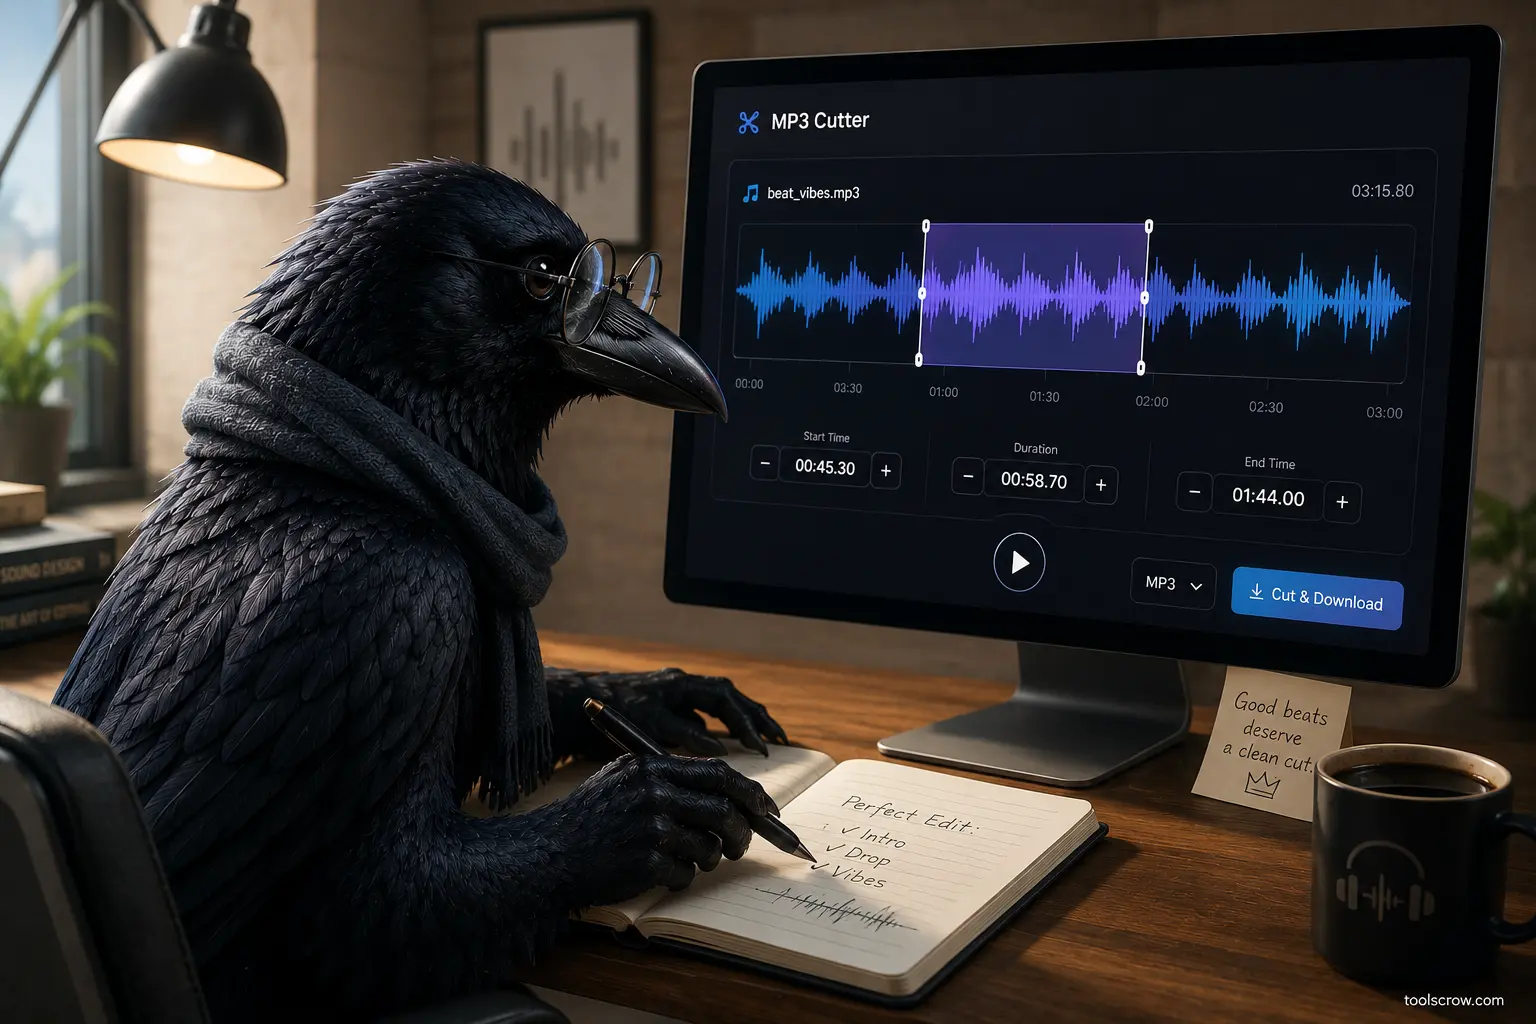
1. Visual Waveform Display
A waveform is a graphical representation of your audio over time — the peaks and valleys in the waveform correspond to loud and quiet moments in the recording. A good MP3 cutter shows you a clear waveform so you can see exactly where sounds begin and end, not just guess by dragging a slider.
Without a waveform, precise editing is essentially impossible for most users. You'd have to play the audio, note the timestamp, and type it in manually — repeating until you found the right moment. That process is slow and frustrating.
Our tool renders a full waveform visualization the moment you load a file, with visual handles you can drag to set your start and end points. You can see exactly where silence ends, where speech begins, where a musical phrase starts. The waveform is drawn directly in your browser using the HTML Canvas API — it's fast, responsive, and updates instantly as you drag.
2. Zoom Control for Precise Editing
Even with a waveform visible, precise editing in a 4-minute audio file displayed in a browser window is challenging. If your entire recording spans 800 pixels, every pixel represents about 300 milliseconds of audio — that's enough margin of error to clip the first syllable of a word or include half a second of background noise you were trying to exclude.
A zoom control expands the waveform horizontally, giving you more pixels per second of audio and allowing genuinely precise selection. Our tool includes a zoom slider (1x to 8x) that expands the waveform while preserving your current selection position. At 8x zoom on a 3-minute recording, each pixel represents roughly 20 milliseconds — precise enough for professional audio editing.
3. Manual Time-Code Entry
Dragging handles on a waveform is intuitive but not always precise enough. For situations requiring frame-accurate editing — cutting a sample to start on an exact beat, or trimming silence to within 50 milliseconds of where speech begins — you need to be able to type in an exact timecode.
Our tool provides dedicated Start and End time input boxes that accept time in MM:SS.mmm format (minutes, seconds, and milliseconds). You can drag the handle to get close, then type in the exact value to nail the precise moment. Both approaches work together rather than in isolation.
4. Preview Before Export
Exporting an audio file and then discovering the cut point was slightly off is a common frustration. A good audio cutter lets you preview your selection before committing to the download. You should be able to listen to exactly what will be exported — with any effects applied — before the file is generated.
Our tool includes both a "Play Selection" button (which plays the selected segment in real time without encoding it) and a "Preview then Download" button (which applies fade effects and normalization to the preview, then offers to download immediately after playback). Loop mode is also available, so you can listen to a loop of your selection to hear how it sounds when repeated — essential for ringtones, music loops, and anything that will be looped in a player.
5. Fade In and Fade Out Effects
An abrupt cut — audio that starts or ends at full volume with no transition — sounds jarring and unfinished in most contexts. A short fade in (gradually increasing from silence to full volume over the first few hundred milliseconds) and fade out (gradually decreasing to silence at the end) produce a clean, professional result even on simple cuts.
Our tool includes a Fade in/out toggle with an adjustable duration in milliseconds. A 200–300ms fade is imperceptible as a fade but eliminates the click or pop that comes from a hard cut. A 1,000–2,000ms fade creates a gentle, intentional fade effect. The choice is yours, and it's applied in real time during encoding — no manual audio editing required.
6. Audio Normalization
If your source audio was recorded quietly — a voice memo on a phone in a large room, for example — the exported clip may be noticeably quieter than other audio in the same context. Normalization automatically adjusts the volume of the exported clip to its maximum level without distortion, ensuring it sounds consistent with professional audio.
This is particularly useful when you're creating multiple clips from different source recordings — normalization ensures they all play back at a consistent perceived volume. Our tool applies normalization as an option before encoding, meaning you get properly levelled output without any additional software.
7. Multiple Output Formats and Quality Settings
Different end uses require different output formats. A ringtone needs MP3. A clip you're going to further edit in a DAW needs WAV (lossless). A podcast preview needs the same format as your episode files (typically MP3 at a specific bitrate).
Our tool exports to both MP3 (at 128, 192, 256, or 320 kbps) and WAV (uncompressed, lossless). MP3 at 192 kbps is transparent to most listeners and produces a reasonably small file — it's the default for a reason. WAV is the right choice when you'll do further editing after exporting, as it preserves every detail of the audio without the quality loss that comes from re-encoding an already-compressed MP3.
8. Complete Privacy — No Server Upload
This is a feature most users don't think to ask about until they've already shared a confidential file with a service they didn't fully vet. Many online audio cutters work by uploading your file to a server, processing it, and sending the result back. Your audio passes through their systems — and for recordings of meetings, interviews, medical appointments, legal discussions, or personal voice notes, that's a meaningful privacy concern.
Our tool processes everything inside your browser using the Web Audio API and JavaScript. Your audio file is read by your browser, the waveform is drawn from data in memory, the trimming happens in memory, and the encoded file is generated in memory and offered as a download. At no point does the audio leave your device. This is verifiable — open your browser's developer tools, check the Network tab, and load a file. You won't see the audio being transmitted anywhere.
How to Cut or Trim an MP3 File: Complete Step-by-Step Guide
Here is the full process for using our free browser-based audio cutter, from loading a file to downloading the finished result. This works for both cutting (extracting a middle segment) and trimming (cleaning up the edges).
➡️ Follow along at toolscrow.com/audio-tools/mp3-cutter/ — free, no account, no upload, works in any browser.
Step 1: Load Your Audio File
Open the tool in your browser and load your audio file using one of two methods: click the "Choose File" button to open a file browser, or drag your audio file directly from your desktop or folder onto the upload area. The tool accepts MP3, WAV, M4A, OGG, FLAC, and all other common audio formats.
Once the file loads, the waveform will appear in the canvas area and your browser will display the full duration of the recording in the Duration label. The start and end time inputs will automatically populate with the full start (0:00.000) and end of the file.

Step 2: Study the Waveform to Find Your Cut Points
Before dragging any handles, take a moment to read the waveform. Loud sections show as tall peaks. Silence shows as a flat line near the center. Speech and music have distinctly different visual signatures once you know what to look for.
For trimming: look for the flat sections at the beginning and end of the waveform where there's no audio activity. Your start handle should go at the point where the waveform first shows meaningful activity. Your end handle should go at the point where the waveform returns to flat.
For cutting: identify the segment you want to extract by playing the audio and noting the timestamps where your desired segment begins and ends. Use the Play button to listen, then pause and note the current time shown in your browser.
Step 3: Set Your Start and End Points
Drag the left handle on the waveform to set your start point. Drag the right handle to set your end point. As you drag, the Start and End time inputs update in real time so you can see the exact time in MM:SS.mmm format.
For precision adjustments, use the Zoom slider to expand the waveform. At higher zoom levels, your drag movements correspond to smaller time increments, giving you finer control over the exact cut point.
For the highest precision, type the exact time directly into the Start or End input boxes. The tool accepts any time in the format M:SS.mmm (e.g., 1:32.450 for one minute, thirty-two seconds, and 450 milliseconds).

Step 4: Preview Your Selection
Click "Play Selection" to hear exactly the segment you've selected — from the start handle to the end handle. This is the most important step before exporting. Listen critically:
- Does the audio start at exactly the right moment — no clipped words, no missing beats?
- Does the audio end at exactly the right moment — no extra noise, no cut-off content?
- Does the selection contain everything you intended and nothing you didn't?
If anything is off, go back and adjust the handles or time inputs. Repeat the preview until the selection is exactly right. This takes thirty seconds and prevents a frustrating re-download.
Enable the Loop checkbox before clicking Play Selection to hear your selection loop continuously — particularly useful for ringtones, music loops, or any clip that will be repeated in use.
Step 5: Configure Export Settings
In the right panel, choose your output format and quality:
- MP3 at 192 kbps — recommended for most uses. Transparent quality for most listeners, reasonable file size. Good for ringtones, podcast clips, social media audio.
- MP3 at 320 kbps — highest quality MP3. Recommended for music production use, DJ samples, or anything where quality preservation matters.
- WAV (lossless) — recommended if you'll do further editing in a DAW, mix the clip with other audio, or need maximum fidelity.
Enable Fade in/out and set a fade duration if you want smooth transitions at the start and end of your clip. A 200–300ms fade is subtle and professional. A 1,000–2,000ms fade is audible and intentional. Leave it off if you need a hard cut — for example, when the clip starts with music on the beat.
Enable Normalize audio if your source recording is quiet or if you're combining multiple clips that need to match in volume.
Set a file name in the Output file name field. The tool defaults to using your source file's name with a "trimmed" label, but you can change this to anything you like.

Step 6: Download Your Trimmed File
Click "Trim & Download." The tool will slice the audio buffer in memory, apply any fade or normalization effects, encode the result to your chosen format, and trigger a download to your device. For WAV files this is nearly instant. For MP3 encoding, the browser's JavaScript engine handles the encoding — on a typical modern computer this takes a few seconds for most clips.
The finished file will appear in your browser's Downloads folder with the filename you specified. Open it in any audio player to verify the result before using it.
📌 Screenshot 4 Note: The "Trim & Download" button is visible at the bottom of Figure 3 above. Clicking it processes your selection in your browser (no upload), then triggers an automatic download of your trimmed audio file.
Task-Specific Guides: The Most Common MP3 Editing Jobs
How to Create a Ringtone From a Song
Ringtones work best when they start on a recognizable, high-energy moment — usually a chorus or a hook — and run for 20–30 seconds. Here's the process:
- Load the full song MP3 into the tool.
- Play the file and note the timestamp where the chorus begins. Pause the playback, note the time displayed.
- Set your Start time to that timestamp.
- Set your End time to approximately 25–30 seconds after the start.
- Enable Fade in (200ms) and Fade out (1,000–1,500ms) — the fade out is important for ringtones, as it makes the phone ring feel less abrupt when you answer or decline the call.
- Preview the clip on loop to hear how it will sound when repeating.
- Export as MP3 at 192 kbps.
- Transfer to your phone and set as ringtone in your device settings.
How to Trim a Podcast Recording
Podcast recordings almost always have dead air, noise, or conversation at the start and end that didn't make the cut. Here's the cleanest workflow:
- Load your recording into the tool.
- Look at the waveform. The flat section at the beginning (before you started speaking) and the flat section at the end (after you finished) will be visually obvious — no peaks, just the flat center line.
- Drag the Start handle to the point where meaningful audio begins — right at the first word or sound you want to keep.
- Drag the End handle to the last meaningful audio — the last word or sound before silence.
- Use zoom to get precise at both ends.
- Enable Normalize if the recording is quieter than your target output level.
- Enable Fade in (100–200ms) and Fade out (100–200ms) for a polished feel.
- Export as MP3 at your episode bitrate (128 kbps for speech-only, 192 kbps for music-inclusive shows).
How to Extract a Music Sample
Music sampling requires the highest precision of any common audio editing task — you need to start and end exactly on the beat, or the sample will sound off when looped.
- Load the source track into the tool.
- Play and identify the start of the section you want — typically the downbeat of a bar.
- Set the Start time using the time input box for precision. Getting within 10–20ms of the downbeat is realistic with zoom.
- Count out the bars you want (4 bars, 8 bars, 16 bars) and set the End time.
- Use the Loop preview mode to listen to the sample looping — if it loops cleanly with no stutter or gap, your timing is right.
- Disable fade effects if you need a hard cut on the beat. Enable a very short fade (50–100ms) if the cut sounds clicky or popping.
- Export as WAV for maximum fidelity if you'll use this in production.
How to Create a 60-Second Clip for Social Media
Instagram Reels, TikTok, YouTube Shorts, and Twitter/X all support 60-second audio clips. The key for social audio is choosing a segment with a clear hook and strong energy throughout:
- Load your source audio (podcast, interview, speech, music track).
- Play through the content and identify the 60-second window that's most engaging — the best story, the most interesting insight, or the most energetic musical moment.
- Set Start and End times to bracket exactly 60 seconds of that content.
- Enable Fade in (300ms) and Fade out (800ms) so the clip doesn't start or end abruptly.
- Enable Normalize to ensure the clip sounds confident and clear on mobile speakers.
- Export as MP3 at 192 kbps — the right balance of quality and file size for social media.
8 Common MP3 Cutting and Trimming Mistakes (And How to Avoid Every One)
Mistake 1: Not Previewing Before Downloading
The single most common cause of needing to re-do an audio edit is skipping the preview step. Exporting takes a few seconds, opening the file takes a few more, and discovering the cut is slightly off wastes time and creates frustration. Using the Play Selection button before every export is a ten-second investment that eliminates this problem entirely. Make it an absolute rule: never export without previewing.
Mistake 2: Clipping the First Syllable or Last Word
When trimming speech recordings, the instinct is to trim as close to the first audible sound as possible — which frequently results in clipping the very beginning of the first word, removing the initial consonant sound. The consonant at the start of a word (the "H" in "Hello," the "T" in "Today") is brief but essential to intelligibility. Leave 50–100ms of space before the first meaningful sound. Your listeners' brains will hear the brief gap as natural and won't notice it — but they will absolutely notice a clipped word.
Mistake 3: Re-encoding an Already-Compressed MP3 at Low Bitrate
MP3 is a lossy format — every time you encode audio as MP3, some quality is permanently lost. Cutting an MP3 and re-encoding it as MP3 applies this quality loss twice. For most uses at 192 kbps this is imperceptible. But if your source file is already a low-bitrate MP3 (128 kbps or lower) and you re-encode to the same or lower bitrate, you may notice artifacts — a thin, brittle quality to the audio. Solution: if the source file is MP3 and quality preservation matters, export your cut as WAV instead of MP3. WAV is lossless and preserves everything from the decoded audio.
Mistake 4: Using a Tool That Uploads Your Files to a Server
This is the privacy mistake. Many popular online audio cutters — including several high-ranking results in search — process files on their servers. Your audio is uploaded, processed, and (usually) deleted after a set period. For personal recordings, medical appointment audio, business meeting recordings, legal proceedings, or any confidential content, this is a meaningful risk. Use a tool that processes locally in the browser, like ours, and you eliminate this concern entirely. Verify by checking the Network tab in your browser's developer tools — if you see the audio file being uploaded during processing, find a different tool.
Mistake 5: Ignoring Fade Effects and Getting Hard-Cut Artifacts
A hard cut — audio that starts or ends instantaneously at full volume — often produces a click or pop artifact at the cut point. This is a physical phenomenon: the audio waveform is being forced from one amplitude to another abruptly, creating a discontinuity that the speaker produces as a click. A very short fade (50–150ms) on both ends completely eliminates this artifact in most cases. Unless you specifically need a hard cut for a rhythmic reason (cutting exactly on a musical beat), enable at least a minimal fade on your exports.
Mistake 6: Editing at Low Zoom and Missing the Target by Hundreds of Milliseconds
At default zoom (1x), a browser-based waveform of a 5-minute recording represents each pixel as several hundred milliseconds. Drag precision at that scale is rough at best. Before setting your final cut points, always zoom in to at least 4x–6x around each cut point to confirm you're where you think you are. A cut that looks right at 1x can be off by half a second — which in speech is the difference between a clean edit and an obviously chopped one.
Mistake 7: Forgetting to Rename the Output File
Most audio cutters default to a generic output filename like "trimmed-audio.mp3" or use the source filename unchanged. If you're creating multiple clips from the same source, you'll end up with a Downloads folder full of identically named files. Set the output filename before each export to something descriptive — "episode-47-intro-clip.mp3," "guitar-sample-Am-bar5.wav," "ringtone-verse-chorus.mp3." This takes five seconds and saves significant confusion when you're looking for a specific file later.
Mistake 8: Expecting the Same Quality From Every Online Tool
Online audio cutters vary enormously in quality — specifically in how they handle the encoding step. A tool that uses high-quality MP3 encoding (like the lamejs library our tool uses) produces output that sounds clean and artifact-free at 192 kbps and above. A poorly implemented encoder produces artifacts at any bitrate. If a cut you've made sounds strange — thin, ringy, or unnatural — try downloading as WAV instead of MP3. If the WAV sounds correct but the MP3 sounds wrong, the issue is the encoder quality of the tool you're using. Our tool uses lamejs, a well-tested, open-source JavaScript MP3 encoder that produces reliable quality at all supported bitrates.
MP3 vs. WAV for Your Exported Clip — Which Format Should You Choose?
The format you export in determines the quality and file size of your result. Here's a practical guide to making the right choice for your specific use case:
| Use Case | Recommended Format | Why |
|---|---|---|
| Ringtone for phone | MP3 at 192 kbps | Small file, fully compatible with all phones |
| Podcast clip for social media | MP3 at 192 kbps | Platform-ready, efficient file size |
| Music sample for DAW production | WAV (lossless) | No quality loss, no re-encoding artifacts |
| Voiceover for video editing | WAV (lossless) | Preserves full quality for video export pipeline |
| Personal voice memo / note | MP3 at 128 kbps | Smallest file, adequate quality for speech |
| Audio for YouTube video | WAV or MP3 at 320 kbps | YouTube re-encodes on upload; start with high quality |
| Sound effect for game or app | WAV (lossless) | Game engines typically work best with WAV source files |
| Podcast episode file | MP3 at 128–192 kbps | Standard podcast format; 128 for speech, 192 for music |
| Further editing in another tool | WAV (lossless) | Always use lossless when you'll edit again after exporting |
The general rule: if this is the final step before the clip is used, MP3 at 192 kbps is usually fine. If you'll edit the clip further, use WAV. If quality is paramount and file size doesn't matter, use WAV.
Frequently Asked Questions About MP3 Cutting and Trimming
Is there any difference in audio quality between cutting and trimming?
No. Both operations are handled identically by the tool — you're selecting a start and end point, and the audio between those points is exported. The quality of the result depends on the output format and bitrate you choose, not on whether you're trimming the edges or cutting from the middle. A WAV export of a trimmed file and a WAV export of a cut file are both lossless representations of whatever audio was between your selected start and end points.
Can I trim an MP3 without losing quality?
Not entirely, if you're exporting back to MP3 — because MP3 encoding is inherently lossy. Every time audio is encoded as MP3, some information is discarded. However, if you export your trimmed audio as WAV, the output is lossless — you preserve every sample of audio exactly as it was in the decoded source. For most practical uses (listening on headphones, sharing on social media, using as a ringtone), the quality difference between a well-encoded MP3 export and lossless WAV is inaudible. For professional production use, export as WAV.
Can I cut multiple segments from the same audio file?
Our tool focuses on exporting one continuous segment at a time — from the start handle to the end handle. If you need multiple separate clips from the same source file, process them one at a time: set your selection for the first clip, export, then set the selection for the second clip and export again. Your source file remains in the tool between exports, so this is efficient — you don't need to reload the file for each clip.
What happens to audio quality when I zoom in on the waveform?
Zooming in affects only the visual display of the waveform — it does not affect the audio or its quality in any way. The zoom control simply expands the waveform horizontally so you can see finer time detail and make more precise selection adjustments. Your audio data is unchanged regardless of the zoom level you use.
Why does my exported clip sound quieter than the original?
If the segment you've exported comes from a quieter section of the original recording — a moment where the speaker is further from the microphone, or a passage in a song with less instrumentation — the clip will naturally be quieter than the full recording's average level. Enable the Normalize audio option before exporting to automatically bring the clip's volume to maximum level without distortion. This is especially useful when the quieter level is not intentional and would sound unprofessionally soft in context.
Does the tool work with large audio files?
Because processing happens in your browser, very large files (above 100MB) may be slow to load and process depending on your device's memory and processing speed. The tool will display a warning for files above this size. For most everyday audio editing tasks — podcast episodes, song clips, voice recordings, samples — files are well within this range. If you're working with very long recordings (multi-hour interviews, long-form documentary audio), consider splitting the file using desktop software before loading it into the browser tool.
Can I undo a cut after I've exported the file?
The export process creates a new file — it does not modify your original. Your source audio file remains completely unchanged on your device. If the exported clip isn't what you wanted, simply reload the original file into the tool and try again with adjusted settings. There's no risk of accidentally overwriting or damaging the source file through the cutting/trimming process.
Why should I use your tool instead of a downloadable app?
For most people doing occasional audio editing, a browser-based tool is faster and more convenient than a downloadable application. You don't need to find, download, install, and learn a new piece of software — you open a tab and start editing. Our tool offers the core features that matter for MP3 cutting and trimming (waveform display, zoom, fade effects, normalization, multiple formats) without the overhead of a full audio editor. If you need multi-track editing, batch processing, spectral repair, or VST plugin support, a dedicated DAW is the right tool. For cutting, trimming, and simple audio editing, a browser-based tool is genuinely sufficient.
Does the fade effect affect the audio quality?
Fade effects do not reduce audio quality — they adjust the volume envelope of the clip. The fade is applied mathematically to the decoded audio samples before re-encoding, meaning the encoded output reflects the faded audio at full fidelity (within the constraints of the chosen output format). A 300ms fade in simply means the first 300ms of the clip ramps from silence to full volume; no quality is lost in that process.
Cut, Trim, Extract — Your Audio Editing Starts Here
The MP3 cutter vs. MP3 trimmer debate, it turns out, is mostly a semantic one. Both terms describe the same fundamental operation: selecting a start and end point in an audio file and exporting what's between them. The real questions are the ones this guide has answered:
- What do you want to keep — the edges of your recording, or a segment from the middle?
- What quality and format does your end use require?
- Do you need fade effects for a polished result?
- How important is privacy — do you want your audio to stay on your device?
The tool at Toolscrow addresses all of these: visual waveform with zoom, precise timecode input, fade in/out with adjustable duration, normalization, MP3 and WAV export with full quality control, and complete local processing that keeps your audio files on your device at every step of the process.
Whether you're trimming a podcast, cutting a ringtone, extracting a music sample, or isolating a 60-second social media clip — the tool is free, it requires no account, and it works right now in the browser you're already using.
Ready to cut or trim your MP3 right now?
Open the free audio cutter → toolscrow.com/audio-tools/mp3-cutter/ — no download, no signup, files stay on your device.
Found this guide helpful? Share it with someone who's still wrestling with downloaded software just to trim an audio clip.

Comments (0)
No comments yet. Be the first to share your thoughts!
Leave a Comment
All comments are reviewed before publishing. Please keep it respectful and on-topic. Comments with links or promotional content will be rejected automatically.