Guide reflects CrowPDF v1.2 annotation tool features. Tested across Chrome, Firefox, Edge, Safari, and mobile browsers.
Why Professional PDF Annotation Is a Skill Worth Learning
Anyone can scribble a note in the margin of a printed document. But professional PDF annotation — the kind that teachers use to give structured feedback on student essays, that copy editors use to mark up a manuscript, that lawyers use to review contracts, that researchers use to build a literature review from dozens of papers — is a genuinely different skill. It's faster, cleaner, more communicable, and infinitely more useful than pen on paper.
The difference between a document covered in vague highlights and one with purposeful, layered annotations isn't the tool you use. It's understanding what each annotation type is actually for, when to reach for each one, and how to combine them to communicate clearly. A highlight without a note attached means nothing to anyone except you. A sticky note in the wrong place creates confusion. A freehand drawing that's too dense obscures the content beneath it.
This guide cuts through all of that. Whether you're a teacher giving feedback on student work, an editor marking up a draft, a researcher building a literature review, a lawyer reviewing a contract, or anyone else who regularly works with PDF documents that need thoughtful markup — this is the guide that takes you from basic to genuinely professional.
Here's what you'll learn:
- What professional PDF annotation actually means — and how it differs from casual marking
- A complete breakdown of every annotation type and exactly what each one is for
- Keyboard shortcuts and workflow habits that separate fast, professional annotators from slow, frustrated ones
- Specific workflows for teachers, editors, researchers, and legal reviewers
- How to use the free browser-based annotation tool — a complete walkthrough of every feature
- Privacy considerations — why where your PDFs get processed matters for professional work
- Common annotation mistakes and how to avoid them
- Answers to the most frequently asked questions about PDF annotation
Let's start with the foundation: understanding what the different annotation types are actually designed to do.
Every Annotation Type Explained — And What Each One Is Actually For
Most annotation tools offer the same core set of markup types. What distinguishes professional annotators is knowing which type to reach for in any given situation — and why. Using the wrong type for a task produces annotations that are harder to read, harder to act on, and harder to communicate to others.
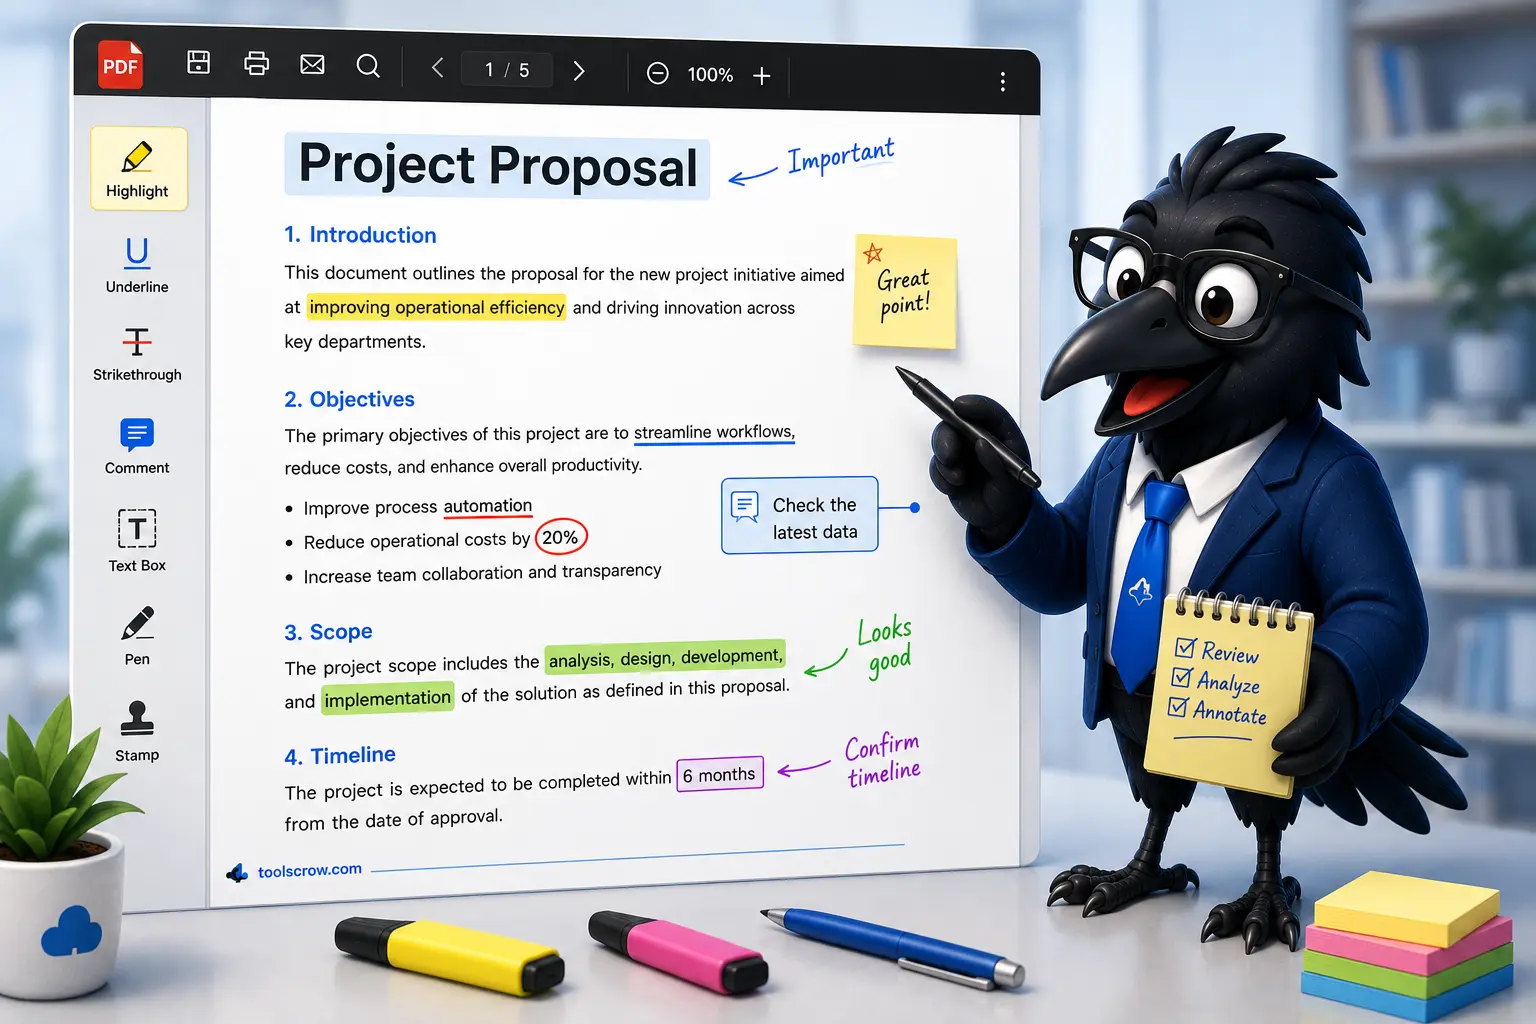
The Highlighter — Your Selective Attention Signal
The highlight is the most used and most misused annotation tool in any PDF editor. Its purpose is specific: to mark content that demands selective attention. Not everything important, not everything you want to remember — things that someone reading your markup needs to notice above all others.
Professional annotators use highlights sparingly. When a researcher highlights 60% of a document, the highlights communicate nothing — every highlighted sentence has the same weight, which means none of them have any weight. When a teacher highlights three sentences in a five-page essay, the student knows exactly where to focus.
In the CrowPDF annotation tool, the highlight tool creates a semi-transparent color wash over any area you drag across — rendered at 50% opacity so the underlying text remains readable. The color palette gives you five preset colors (blue, red, green, yellow, purple) plus a custom picker. Professional practice typically uses color coding: one color for key claims, another for supporting evidence, a third for problems or errors. Establish your system before you start and stick to it across a document.
The Draw Tool — For Visual Precision and Emphasis
Freehand drawing on a PDF canvas is what the draw tool provides: strokes that follow your mouse, finger, or stylus precisely, with adjustable stroke width (1–20px via the Size slider) and opacity (10–100% via the Opacity slider). The stroke is rendered with rounded line caps and joins, making even mouse-drawn lines look clean rather than jagged.
Professional uses for freehand drawing:
- Circling an error — faster and more natural than placing a shape around something
- Underlining with emphasis — a freehand underline can be squiggly (indicating uncertainty), straight (strong emphasis), or double-underlined (critical importance), communicating nuance that a highlight cannot
- Bracketing a section — a vertical line in the margin beside a paragraph signals "this whole section has an issue" without obscuring the text
- Informal diagrams — drawing a rough structure diagram on a blank area of the page to explain a concept visually
Keep stroke width modest for editorial work — 2–3px reads cleanly and doesn't dominate the page. Reserve heavier strokes (6px+) for things you want to flag dramatically, used rarely for maximum impact.
Text Boxes — For Structured Written Comments
The text tool places a resizable text box anywhere on the page. This is the right choice for any comment that requires more than a word or two — a question that needs answering, a suggestion that needs context, a correction that needs explanation. Text boxes are the workhorses of editorial annotation.
In the tool, clicking with the text tool opens an editable box. You type your comment, press Enter (or click away) to save it, and the comment appears as a permanent text element overlaid on the page. The box can be dragged to any position and resized by dragging its edges. Double-clicking the saved text puts it back into edit mode.
Font size is controlled by the Size slider — adding 12 to the slider value gives you the effective font size (a slider at 4px gives a 16px font, a slider at 8px gives a 20px font). Color applies to the text and border simultaneously. Background is semi-transparent white, ensuring legibility against complex page content.
Professional text box practice: keep comments actionable. "Unclear" communicates a problem but not a solution. "Unclear — consider defining this term in the previous paragraph" gives the author something specific to do. The best editorial comments are specific, directed at the content rather than the author, and constructive.
Sticky Notes — For Extended Commentary
Sticky notes are resizable, draggable comment blocks styled distinctively from the page content — yellow gradient background, rounded corners, slightly informal font (Comic Sans MS in the tool, which looks deliberately distinct from document body text). They're immediately recognizable as supplementary comment rather than page content.
Sticky notes in this tool are created by clicking anywhere on the page with the Note tool. They're fully editable in place — click to type, drag to move, resize by dragging the corner handles. Double-clicking a sticky note prompts you to delete it if you no longer need it.
The key distinction between sticky notes and text boxes in professional practice: sticky notes are for extended, contextual commentary that belongs alongside the page but isn't a direct markup of the text. A text box saying "word choice issue" points to specific text. A sticky note explaining "this section assumes the reader already knows X — consider adding a brief definition in the introduction" provides broader context that doesn't belong directly on the specific line.
Shapes — For Structure and Visual Organization
The shape tool provides three options: rectangles, ellipses (ovals and circles), and arrows. Each serves a distinct annotation purpose.
Rectangles are the selection and grouping tool of annotation. Drawing a rectangle around a paragraph, equation, figure, or section signals "pay attention to this as a unit." This is more precise than highlighting (which marks individual lines) when you want to call attention to a multi-element section as a coherent whole.
Ellipses work similarly but with a softer visual weight — more common for circling individual words, figures in tables, or specific values that need correction. Pressing Shift while drawing creates a perfect circle.
Arrows are uniquely powerful for showing relationships: this text connects to that figure, this error repeats on the previous page, this element belongs elsewhere. Drawn from a source point to a destination, arrows communicate directionality and connection in a way no other annotation type can.
In the tool, the shape selector appears in the Tool Properties panel when the Shapes tool is active. All shapes render as outlines (not filled) using the selected color at the selected line width. Stroke width 2–4px is standard for editorial shapes; heavier strokes are for visual emphasis rather than structural markup.
The Eraser — For Precision Cleanup
The eraser removes annotations by clicking or dragging across them on the overlay canvas. It targets the topmost annotation at any given point, so if annotations overlap, you may need to erase in layers. For a complete reset of the current page, the "Clear All Annotations" button (trash icon in the viewer controls) removes everything at once with a confirmation prompt.
Professional practice: use the eraser for targeted corrections — an annotation that landed in the wrong place, a shape that's sized incorrectly, a highlight that extended too far. For broader cleanup, Ctrl+Z (Undo) is often faster for recent mistakes, with up to 50 undo steps stored per session.
The Select Tool — For Moving and Adjusting
The select tool switches the canvas to interaction mode: clicking on any annotation selects it, and you can then drag it to a new position. This is how you reposition a text box that landed in the wrong place, move a sticky note to a better location, or shift a shape after resizing the underlying content you were referencing.
Annotations on the overlay canvas (draws, shapes, highlights) are draggable via select mode. Text boxes and sticky notes are always draggable directly regardless of the active tool. The select cursor (pointer) clearly indicates when you've hovered over a draggable element.
Keyboard Shortcuts and Workflow Habits That Make You Faster
The difference between a professional annotator and an amateur isn't just what they mark — it's how efficiently they work. A teacher who can mark up a 10-page essay in 12 minutes can provide feedback on 15 essays in the time it takes a slow annotator to do five. Keyboard shortcuts are where that efficiency lives.
Complete Keyboard Shortcut Reference
| Action | Shortcut | When to Use |
|---|---|---|
| Select tool | S | After placing an annotation you need to reposition |
| Draw tool | D | Quick freehand markups without reaching for the mouse |
| Highlight tool | H | Switching between highlighting and other tools rapidly |
| Text tool | T | Adding written comments without switching to the panel |
| Note tool | N | Dropping a sticky note for extended commentary |
| Shapes tool | R | Drawing rectangles, ellipses, or arrows |
| Eraser tool | E | Removing a misplaced annotation immediately |
| Undo | Ctrl+Z / Cmd+Z | Reverting the last action (up to 50 steps) |
| Redo | Ctrl+Y / Cmd+Y | Restoring an action you undid accidentally |
| Export PDF | Ctrl+S / Cmd+S | Saving your annotated PDF when done |
| Previous page | ← Arrow | Navigating backwards without touching the mouse |
| Next page | → Arrow | Moving forward through a multi-page document |
| First page | Home | Jumping to the beginning of a document |
| Last page | End | Jumping to the end of a document |
| Cancel text edit | Escape | Discarding a text annotation before saving it |
| Save text annotation | Enter | Committing a text box comment (Shift+Enter for line break) |
| Clear page annotations | Ctrl+Delete | Wiping current page clean (with confirmation) |
The Three Workflow Habits That Change Everything
1. Set up your color code before you open the first page. Decide what each color means for this document before you start marking it up. Five minutes establishing a color code (blue = key claim, yellow = supporting evidence, red = error or problem, green = particularly strong writing, purple = unclear or needs clarification) saves you from retroactively going back to color-code things. The tool's five preset colors map cleanly to this kind of system.
2. Work top to bottom through each page before moving on. The temptation is to jump around — spot an error, mark it, spot another, jump back. This produces disorganized annotation that's hard to follow. Professional reviewers read each page sequentially, annotating as they go, then move on. The thumbnail panel and keyboard arrow navigation make this easy — you never need to take your hands off the keyboard to move between pages.
3. Use Undo freely, but Export before you walk away. The undo stack holds 50 steps per session. Don't be precious about annotations — place something, evaluate it, undo if it's not right, try again. But when you stop working on a document, even temporarily, export the PDF immediately. Browser sessions can end unexpectedly. Your annotations exist only in memory until you click Export. The Ctrl+S shortcut makes this a two-keystroke habit.
Professional Annotation Workflows by Role
Different professional contexts call for different annotation strategies. Here are detailed workflows for the four roles that use PDF annotation most heavily.
The Teacher's Workflow: Giving Effective Written Feedback
Feedback on student writing needs to be specific, constructive, and prioritized — students can only absorb so much at once, and feedback that overwhelms without direction tends to produce anxiety rather than improvement.
Color code for essay feedback:
- Yellow highlight — strong writing: something done particularly well
- Red highlight — the primary area for improvement: the one thing that most affects the grade
- Blue highlight — secondary issues: word choice, grammar, structure
Annotation layering strategy: Highlight first (marking what to address) then add text boxes or sticky notes only where the issue needs explanation. If the issue is clear from the highlight alone — a repeated word, an obvious grammar error — the highlight is sufficient. Reserve text comments for issues that require explanation: "Why does this claim matter?" "This transition loses the reader — consider linking back to your thesis from the previous paragraph."
The final sticky note: End every document with one sticky note on the last page — an overall summary comment that gives the student a holistic sense of the paper's strengths and the single most important area to develop. This is the comment students read first and remember longest.
Lock the page after finishing it: Use the lock button (padlock icon) to lock each page once you've finished annotating it. This prevents accidentally adding or moving annotations on completed pages as you scroll. The lock restricts all annotation tools except Select, which is still available for reviewing.
The Editor's Workflow: Structural and Line-Level Markup
Professional editing operates at two levels simultaneously: structural (is the argument or narrative organized correctly?) and line-level (is this sentence well-written?). Good editorial annotation addresses both without conflating them.
Color code for editorial markup:
- Red draw/shapes — structural issues: sections out of order, missing transitions, argument gaps
- Blue text boxes — line-level suggestions: word choice, clarity, phrasing
- Yellow highlights — passages that are particularly well-written and should be preserved or used as models
- Purple sticky notes — meta-level comments: overall impression, key patterns, suggestions for next draft
Using arrows for structural issues: When a paragraph belongs earlier in the document, an arrow annotation from the paragraph to its ideal position is immediately clear — clearer than any written description of "this should move to page 3." Combine with a brief text box explaining why the move improves the structure.
The rectangle for "consider cutting": Drawing a rectangle around a section with a brief text note "consider cutting — does this add to your argument?" is a gentler, clearer intervention than "DELETE" written in red. The rectangle makes the scope clear; the note makes the reasoning available.
The Researcher's Workflow: Building a Literature Review
Researchers annotating academic papers for a literature review need annotations that will be useful days or weeks later, not just in the moment. Annotations need to be self-explanatory, well-organized, and searchable by theme across multiple papers.
Color code for research reading:
- Blue highlight — key claims and findings: what this paper argues
- Green highlight — methodology details: how they gathered and analyzed data
- Yellow highlight — evidence and citations: what they cite in support
- Red draw/circles — limitations and critiques: gaps, problems, or contradictions
Sticky note at the top of every paper: Before reading a paper for annotation, drop one sticky note on page 1 with a brief summary template: paper title/author, core argument in one sentence, relevance to your research question, limitations noted. Fill this in as you read. When you return to the paper weeks later, this note tells you immediately whether you need to re-read the details or can use it as a summary reference.
Navigation between pages: Research papers are dense and multi-page. Use the thumbnail panel to quickly jump between sections rather than scrolling. The annotation count display in the viewer header ("X Annotations") tracks how many annotations are on the current page, giving you a sense of how densely marked any given page is.
The Legal Reviewer's Workflow: Contract and Document Review
Legal annotation has very specific requirements: nothing ambiguous, every annotation clearly tied to a specific clause, issues categorized by type and severity, and privacy of document contents a serious concern.
Color code for legal review:
- Red rectangle/highlight — issues requiring negotiation or client attention before signing
- Yellow highlight — clauses requiring client confirmation (factual accuracy, business terms)
- Blue text boxes — informational comments: "Standard boilerplate," "Consistent with industry norm," "See our standard template Clause 12.3"
- Green highlight — particularly favorable clauses for client awareness
Privacy is non-negotiable in legal work. Legal documents contain highly sensitive information. Any tool that uploads your files to a server for processing is categorically inappropriate for annotating a confidential contract, a litigation document, or a client agreement. The browser-based architecture of the annotation tool referenced in this guide — where all processing happens in your browser using PDF.js and PDF-LIB, with no server upload at any stage — is the correct model for sensitive legal document work. Verify this by checking your browser's Network tab during a session; you'll see no document being transmitted.
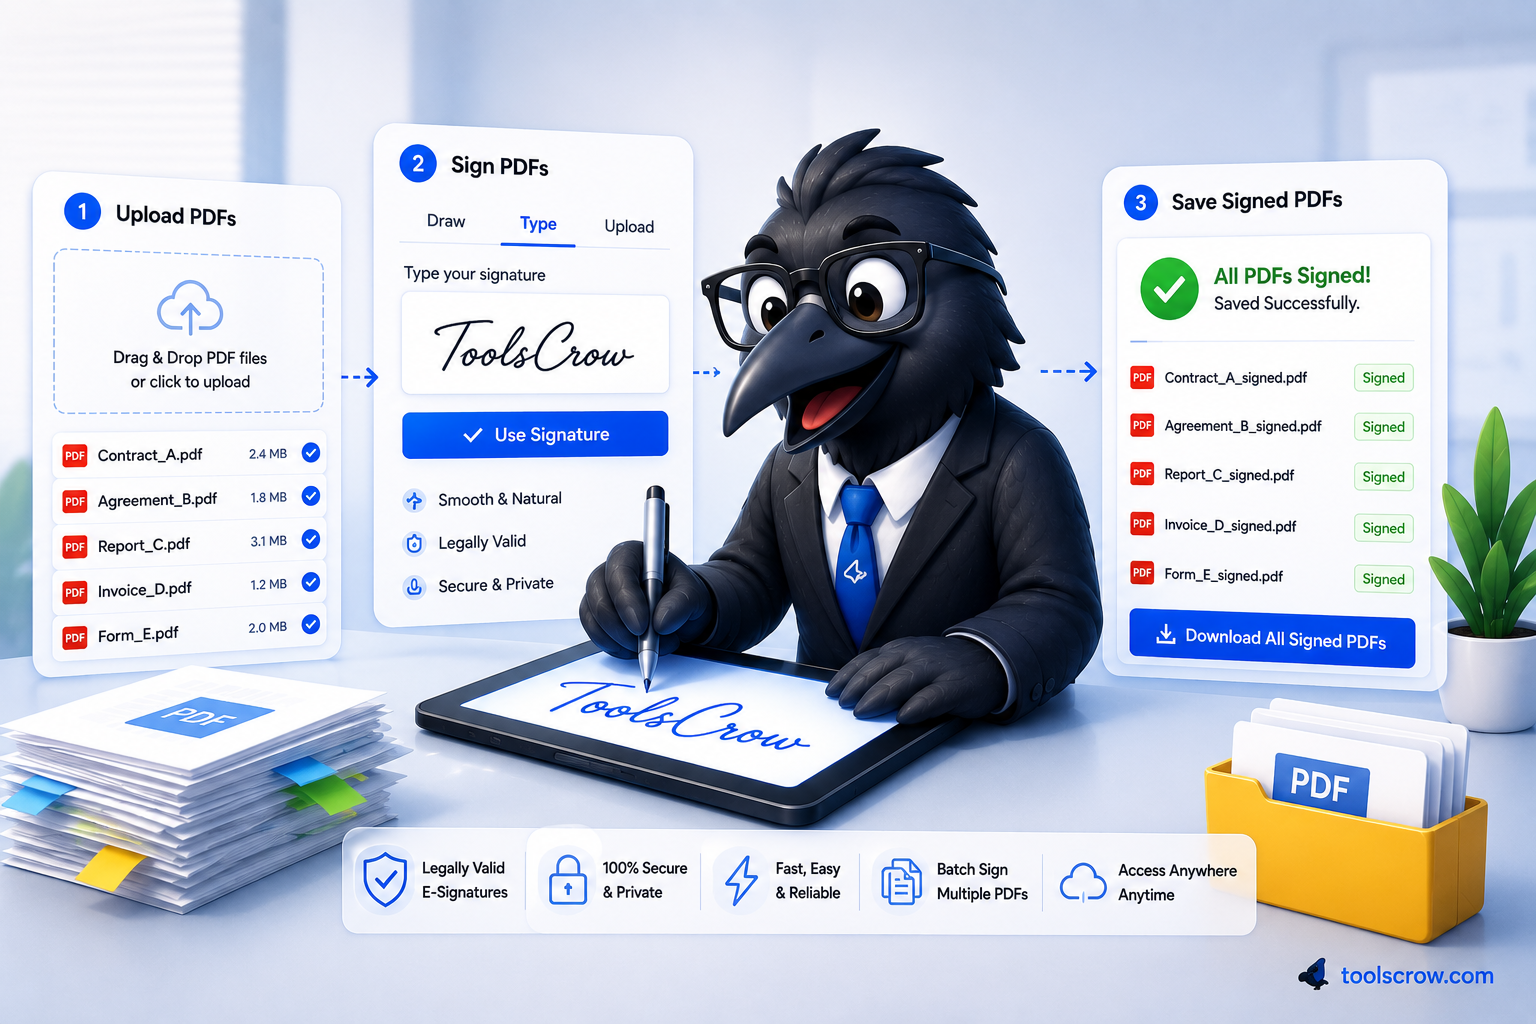
Complete Step-by-Step Walkthrough: CrowPDF Annotation Tool
➡️ Follow along at toolscrow.com/pdf-tools/annotate-pdf/ — free, browser-based, no login, files never leave your device.
Step 1: Upload Your PDF
Open the tool and either click "Choose PDF File" or drag a PDF directly onto the upload zone. The tool accepts all standard PDF versions (1.0–2.0) and supports files up to 100MB (optimal under 50MB for speed). Once uploaded, a progress bar tracks the loading process through two stages: document processing and thumbnail generation.
The file name, size, and page count appear in the document info area above the viewer once loading completes. The thumbnail panel on the right populates with a thumbnail image of every page — rendered at 20% scale for preview — giving you an immediate bird's-eye view of the document's structure before you start annotating.

Step 2: Set Up Your Tool Properties
Before annotating page one, configure the properties panel in the right sidebar:
- Color: Choose from the five preset swatches or open the custom color picker for any hex or RGB color. The active swatch is indicated by a ring highlight.
- Size: Adjust the stroke size slider (1–20px) for drawing and shape line weight, or the text size for text annotations. The current value displays as "Xpx" next to the label.
- Opacity: Set transparency for all annotations (10–100%). At 100% all annotations are fully opaque. For highlights, the tool automatically applies 50% opacity regardless of the slider; for draws, shapes, and text boxes, the slider controls final opacity directly.

Step 3: Navigate and Annotate
Select your annotation tool using the tool grid or keyboard shortcut. The tool buttons display single-letter shortcuts beneath each label. Navigate pages using the Previous/Next buttons, the first/last page buttons, or keyboard arrow keys. The current page displays as "X / Y" in the page navigation bar.
For multi-page documents, use the thumbnail panel to jump directly to any page — click any thumbnail and the main viewer jumps immediately. The active page's thumbnail shows a highlight ring to indicate your current position.

Step 4: Use the Lock Feature for Page-by-Page Control
Once you've finished annotating a page to your satisfaction, click the padlock icon in the viewer controls to lock that page. Locked pages disable all annotation tools except Select — you can still view and move existing annotations but cannot add new ones. The lock icon and a "locked" indicator make the state visually clear. Click again to unlock.
This is particularly valuable for teachers working through long student submissions — locking completed pages prevents accidentally marking a page you've already reviewed, which is easy to do when navigating rapidly with arrow keys.
Step 5: Manage Annotations — Undo, Redo, Select
The undo/redo stack stores up to 50 states per session. Use Ctrl+Z freely — every annotation action (add, move, delete) is separately undoable. The Undo and Redo buttons in the tool grid are enabled/disabled dynamically based on the stack state; a grayed-out button means there's nothing to undo or redo in that direction.
To reposition any annotation after placing it, switch to the Select tool (S key) and drag the annotation to the new position. Text boxes and sticky notes can be dragged at any time regardless of the active tool.

Step 6: Export Your Annotated PDF
Click "Export PDF" (or Ctrl+S) when your annotations are complete. The export process:
- Renders each original PDF page at its native resolution using PDF.js
- Calculates the scale factor between the display canvas dimensions and the original PDF page dimensions
- Draws all annotations onto the rendered page at correctly scaled coordinates
- Embeds sticky note content (including formatted text wrapping) as drawn elements
- Embeds all pages as images into a new PDF document using PDF-LIB
- Downloads the result as a timestamped file:
annotated-pdf-YYYY-MM-DD-HH-MM-SS.pdf
A progress indicator shows "Processing page X of Y" during export. For most documents this completes in seconds. The Export button is disabled until a PDF is loaded, and re-enables immediately after export completes.

Privacy and Security: Why It Matters More Than You Think
For many users, PDF annotation is a private activity — feedback on a student's personal essay, markup on a confidential client contract, notes on a sensitive medical research paper, comments on an unpublished manuscript. The documents being annotated are often exactly the kind of content that should never leave your device.
How Browser-Based Processing Protects Your Documents
The annotation tool at toolscrow.com processes everything using two JavaScript libraries that run entirely in your browser: PDF.js renders your PDF pages onto HTML Canvas elements locally, and PDF-LIB assembles the annotated output PDF in memory on your device. At no point does your PDF file travel across the internet to a server.
You can verify this independently: open your browser's Developer Tools (F12), click the Network tab, then upload a PDF to the tool and annotate it. Watch the network activity. You'll see the page's own assets (scripts, stylesheets) load when the page opens. But during upload, annotation, and export, you'll see no request containing your PDF data — because no such request is made.
This matters especially for:
- Teachers annotating student work, which may contain personal information about minors and is often subject to privacy regulations (FERPA in the US, GDPR in Europe)
- Lawyers and paralegals annotating client documents, contracts, and litigation materials subject to attorney-client privilege
- Healthcare professionals working with any document containing patient information (HIPAA-governed in the US)
- Editors and publishers working with unpublished manuscripts that authors haven't yet publicly shared
- Researchers annotating pre-publication papers, grant applications, or proprietary data reports
For any of these contexts, a tool that uploads your document to an external server — even one with strong stated security practices — introduces risk that a browser-local tool simply does not. The browser-local model doesn't require trusting anyone's security practices because the data never goes anywhere to begin with.
Annotating on Mobile Devices and Touchscreens
A significant and growing portion of PDF review and feedback happens on tablets and phones — a teacher reviewing submissions during a commute, a reviewer reading a document over lunch, a student marking up an assigned reading on their iPad. The CrowPDF annotation tool is built to handle this with a dedicated mobile experience.
The Mobile Floating Action Button
On small screens, the full tool panel from the desktop layout would dominate the viewport. Instead, the tool collapses the annotation tools into a floating action button (FAB) — a circular button in the bottom-right corner of the screen with a paintbrush icon. Tapping it opens the Mobile Tools Modal, which presents all annotation tools in a touch-friendly grid layout. Tapping any tool selects it and closes the modal, returning you to the document.
Touch Drawing and Annotation
All drawing, highlighting, and shape creation on mobile works with touch events — single-finger drag to draw, create shapes, or highlight. The tool specifically prevents touch event interference with page scrolling while you're actively annotating: scroll events pass through normally when no drawing is in progress, but are blocked during active strokes to prevent the page jumping while you're making a mark.
For drawing signatures, complex shapes, or precise freehand annotations on a touchscreen, a stylus provides dramatically better control than a finger. Any stylus that works with your device's touchscreen will work with this tool — there's no special hardware support required beyond what your device natively provides.
Zoom for Precision on Small Screens
The zoom control (50%–150%) is particularly valuable on mobile, where the text on a standard A4 or Letter PDF can be quite small at default viewing size. Zoom in to 130–150% when placing text annotations or highlighting specific lines; zoom back out to see the full-page context. The zoom range is intentionally capped at 150% to prevent the canvas becoming unmanageably large on memory-constrained mobile devices.
Page Navigation on Mobile
The page navigation bar at the bottom of the viewer persists on mobile. Previous/Next buttons are touch-sized for comfortable thumb operation. The thumbnail panel remains accessible by scrolling down in the tools area, though on very small screens it may be more practical to use the navigation buttons for page-by-page movement.
9 Common PDF Annotation Mistakes — And How to Avoid Every One
Mistake 1: Over-Highlighting Until Nothing Is Emphasized
If more than 20–25% of your document is highlighted, the highlights are no longer doing their job. Emphasis requires contrast — if everything is emphasized, nothing is. Review your highlights at the end of each page. If more than two or three passages are marked, ask yourself which ones genuinely require the reader's attention above all others and remove the rest.
Mistake 2: Making Annotations That Only Make Sense Right Now
An annotation that says "check this" or "fix this part" communicates nothing to someone reading the document next week — including yourself. Every annotation should be self-explanatory without the context of the moment you wrote it. "This statistic needs a citation" is far more useful than "citation needed?" written in three characters.
Mistake 3: Forgetting to Export Before Closing the Tab
Annotations exist in browser memory. They are not saved to the file on your device. If you close the tab, navigate away, or your browser crashes, your annotations are gone. Use Ctrl+S to export immediately when you finish annotating, and again whenever you finish a significant section in a long review session. Make it as automatic as saving a document — it takes one keystroke.
Mistake 4: Placing Text Boxes Over Critical Content
A text annotation placed directly over an important table, figure, or equation can obscure the content it's supposed to reference. Position text boxes in the document's margin areas (white space to the side, below, or between paragraphs) rather than on top of content. Use arrows from the text box to point at what the comment references if needed.
Mistake 5: Using the Wrong Annotation Type for the Task
A freehand circle where a rectangle would be cleaner. A text box where a sticky note belongs. A highlight where a shape would communicate structure more clearly. Take a moment before starting to annotate to think about which types serve your purpose. The right tool for the right job produces annotations that communicate more clearly with less visual noise.
Mistake 6: Inconsistent Color Coding
Using red for errors on page 1 and red for "particularly good" on page 4 produces a document that a reader cannot trust. Establish your color code at the start and follow it rigidly through the entire document. If you're handing the annotated document to someone else, include a brief legend — either in a sticky note on page 1 or in your email cover note — explaining what each color means.
Mistake 7: Annotating Without Zooming In First
Placing annotations at default zoom on a densely formatted PDF often produces marks that land slightly off-target — a highlight that extends one line beyond the intended selection, a circle that's slightly too large and includes adjacent content. For precise work, zoom to 130–150% before placing annotations in detailed areas, then zoom back out to check the full-page context.
Mistake 8: Not Using the Undo Stack for Experimentation
Some annotators place an annotation, dislike it, and then carefully erase it or switch to the eraser to remove it. With a 50-step undo stack and a two-keystroke shortcut (Ctrl+Z), there's never a reason to do this. Place annotations freely, evaluate them in context, undo immediately if they're not right. The undo stack is designed for exactly this kind of iterative refinement.
Mistake 9: Sending an Annotated PDF Without Reviewing It First
Before sending any annotated document — to a student, a client, a colleague — scroll through the entire annotated version. Check that no annotation fell in an unintended position, that no text box is empty, that sticky notes contain complete thoughts, and that the overall annotation density is appropriate. What looks clear in the process of annotating can look chaotic to a fresh reader. A two-minute review pass consistently improves the quality of the feedback you send.
Frequently Asked Questions About PDF Annotation
Are my annotations permanently embedded in the exported PDF?
Yes. When you export, the tool renders each PDF page at its original resolution, draws all annotations onto the rendered canvas at correctly scaled positions, and assembles the result into a new PDF. The annotations become part of the page image in the output file — they cannot be selected, edited, or removed by a recipient opening the file in a standard PDF viewer, because they're flattened into the page content rather than stored as separate, editable annotation objects. This is the correct behavior for most professional use cases (feedback documents, reviewed contracts) where the annotations should be permanent and unmodifiable by the recipient.
Can the recipient edit or remove my annotations?
No. Because the annotations are exported as page image content rather than editable PDF annotation objects (the kind created by Adobe Acrobat's native annotation system), they cannot be selected or deleted by anyone opening the file in a PDF viewer. The annotated document is a flat image of each annotated page. If you need the recipient to be able to edit or respond to annotations using their own PDF editor, you would need a tool that creates native PDF annotation objects (XFA or FDF annotation streams) — a different technical architecture than image-based annotation tools.
How many pages can I annotate?
The tool supports PDFs up to 100MB. Page count is limited primarily by your device's available memory rather than a hard page cap — a 200-page text document annotates easily, while a 100-page document with full-page high-resolution images may strain memory on lower-end devices. The tool recommends files under 50MB for optimal performance. Very large documents are better split and annotated in sections using a PDF split tool before uploading.
Can I annotate a password-protected PDF?
The tool will report that a password-protected PDF cannot be opened if it has open-password encryption. Remove the password first using the PDF Unlock tool (which also runs entirely in your browser), then upload the unlocked version for annotation. Permission-restricted PDFs (that open without a password but have edit/copy restrictions) can typically be loaded and annotated normally, because the tool reads the visual content of the page regardless of permission restrictions.
What happens to my annotations if I navigate away from the page?
Navigating between pages within the tool preserves all annotations — each page's annotation state is maintained in memory as you move through the document. What causes loss of annotations is closing the browser tab, refreshing the page, or the browser crashing. Export your annotated PDF frequently during long annotation sessions. The keyboard shortcut Ctrl+S makes this a quick, low-friction habit to develop.
Can two people annotate the same PDF simultaneously?
Not with this tool in its current form. The browser-based architecture processes everything locally on one device, with no cloud sync or shared session functionality. For collaborative real-time annotation, dedicated platforms (Google Docs comment mode, Notion, or enterprise PDF tools with cloud sync) are more appropriate. For sequential review — where one person annotates and sends to another who adds their own annotations on top — the exported PDF can be uploaded again for a second round of annotations.
Does the annotation tool work with scanned PDFs?
Yes. Scanned PDFs are rendered as page images just like any other PDF content. The tool draws annotations directly onto the rendered canvas regardless of whether the underlying page content is native text/vector or scanned image. The export also works identically. Note that scanned PDFs don't have selectable text, so the text tool creates text boxes as overlaid elements rather than inline text edits — which is the correct behavior for annotating a scanned page.
Is there a limit to how many annotations I can add per page?
There's no hard limit on annotation count per page. The undo stack holds 50 total states, but annotation count is separate from undo history depth. Practically speaking, very dense annotation (hundreds of overlapping annotations on a single page) will consume more browser memory and may slow rendering, but the tool doesn't impose a specific maximum. The annotation count display in the viewer header ("X Annotations") tracks how many annotations are currently on the active page.
Can I use this tool for annotating academic papers to share with colleagues?
Yes, and it's well-suited to this use case. The highlight, text box, sticky note, and drawing tools all work well for academic paper annotation. The color coding system described in the Researcher Workflow section above maps directly to systematic literature review practices. Because the annotations are flattened into the exported PDF, colleagues receive a document that shows your markup in any standard PDF viewer without needing any special software to display the annotations correctly.
From Basic Markup to Professional Annotation — Your Starting Point
Professional PDF annotation isn't about using every tool available in every document. It's about understanding what each annotation type communicates, building a consistent system before you start, working efficiently with keyboard shortcuts, and maintaining the discipline to annotate purposefully rather than prolifically.
The six tools in the CrowPDF annotation tool — highlight, draw, text, note, shapes, and eraser — are exactly the right set for professional annotation work. Not so many that the choice is paralyzing, but complete enough to handle every legitimate markup need that a teacher, editor, researcher, or legal reviewer will encounter in real professional work.
Here's the practical starting point for your first professional annotation session:
- Upload your PDF to the tool
- Decide your color code before touching the first tool — two minutes now saves confusion through the whole document
- Work top to bottom, page by page, using keyboard shortcuts to switch tools without lifting your hands
- Use highlights sparingly, text boxes precisely, and sticky notes for extended commentary
- Export with Ctrl+S when you finish — never leave the tab without exporting
Your first annotated PDF using this workflow will look noticeably more organized than what you're used to producing. The tenth will be faster and better still. Professional annotation is a skill, and like all skills, it compounds with practice.
Ready to annotate your first PDF?
Open the free browser-based tool → toolscrow.com/pdf-tools/annotate-pdf/ — nine annotation tools, 50-step undo, no upload, no account required.
Working with documents that also need page numbers, signatures, or password removal? Check out our full PDF tools suite — all free, all browser-based, all private.


Comments (0)
No comments yet. Be the first to share your thoughts!
Leave a Comment
All comments are reviewed before publishing. Please keep it respectful and on-topic. Comments with links or promotional content will be rejected automatically.